When it comes to drying acrylic nails using a UV lamp, the process and time can vary based on several factors. While acrylic nails typically harden naturally without UV light, the role of a UV lamp in this process has been a topic of debate. The question arises: How long does it take for a UV lamp to dry acrylic nails?
The drying time for acrylic nails under a UV lamp is generally 2-3 minutes, but it can vary depending on the specific product and lamp instructions. UV lamps are not necessary for acrylic nails, as they naturally harden in 10-15 minutes.
To fully understand how long it takes for a UV lamp to dry acrylic nails, we need to delve into the specifics of the products used and the nature of the drying process. In the following paragraphs, we will explore the drying times under a UV lamp in detail, considering various perspectives and guidelines to provide a comprehensive answer.
Overview of the Acrylic Nail Application Process
Acrylic nails are popular for those seeking durable and stylish nail enhancements. The application process is intricate and requires precision to ensure a flawless finish. Let’s delve into the steps involved:
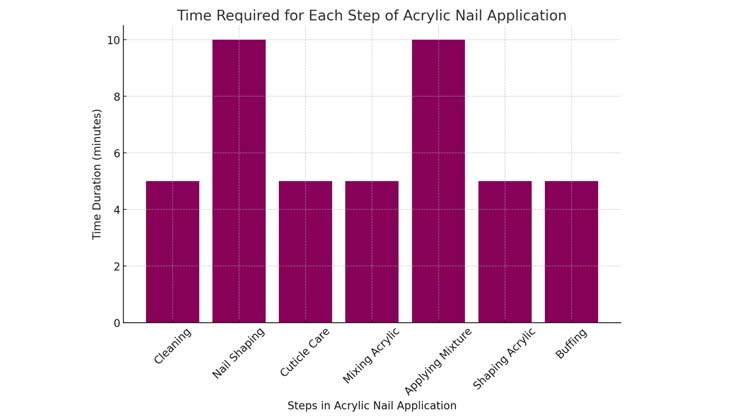
- Initial Preparation of the Natural Nails:
- Cleaning: Start by thoroughly cleaning your natural nails. This step is crucial for removing any oils or debris that might hinder the adhesion of the acrylic.
- Nail Shaping: Shape your nails to your desired style using a nail file. Whether you prefer square, round, or almond-shaped nails, shaping them first ensures a more tailored and professional look.
- Cuticle Care: Gently push back the cuticles. Remember, the health of your cuticles is paramount for the longevity of your acrylic nails.
- Application of the Acrylic Mixture:
- Mixing Acrylic Powder and Liquid: The mixture should have a bead-like consistency. It’s a delicate balance – too runny, and it won’t set properly; too thick, and it becomes challenging to shape.
- Applying the Mixture: Using a brush, apply the acrylic mixture to your nails. As a nail expert, I recommend starting from the base and working your way to the tip. Ensure even coverage to avoid lumps or uneven surfaces.
- Shaping and Buffing the Acrylic Nails:
- Shaping: Once the acrylic has hardened, shape the nails again. This step fine-tunes the initial shaping and ensures symmetry.
- Buffing: Buff the surface of the acrylic nails to create a smooth, even texture. It’s essential for the final look and for the effective application of any nail polish or designs.
During each of these steps, consider factors like room temperature and humidity, as they can influence the setting time and quality of the acrylic. For more insights into the complexities of DIY acrylic nail applications, explore Difficulties of Applying DIY Acrylic Nails.
Remember, the acrylic application process sets the foundation for the final look. Each step must be executed carefully to ensure your nails are ready for the next stage – curing under a UV lamp.
Understanding UV Lamp Technology in Nail Care
As a nail expert, I’ve seen firsthand the evolution of nail care technology, particularly in the realm of UV lamps. These devices play a crucial role in setting acrylic nails to perfection. Let’s explore the different types of UV lamps and how they revolutionize the nail-curing process.
- Types of UV Lamps:
- Traditional UV Lamps: These lamps use ultraviolet light to cure nail products. They’re effective but often require longer exposure times.
- LED UV Lamps: A more modern innovation, LED UV lamps cure nails faster than traditional UV lamps. They are energy-efficient and have a longer lifespan, making them a preferred choice in professional salons.
- How UV Lamps Work:
- The science behind UV lamps is fascinating. These lamps emit UV light, which reacts with the photoinitiators in the nail products. This reaction causes the product to harden or ‘cure’ quickly and efficiently.
- LED UV lamps, in particular, emit a narrower spectrum of UV light, which is why they cure certain types of gel products faster than traditional UV lamps.
The choice between a traditional UV lamp and an LED UV lamp often depends on the specific requirements of the nail product used. For example, some gels are formulated specifically for LED curing and may not set properly under traditional UV light. It’s essential to match the lamp type to the product for optimal results.
Understanding the technology behind these lamps is crucial for anyone serious about nail care. Whether you’re a salon professional or a DIY enthusiast, knowing how these lamps work can significantly enhance the quality of your acrylic nail applications. For an in-depth look into the duration and effects of acrylic nails under UV lamps, consider visiting Duration Acrylic Nails, where I delve into the nuances of this technology.
Preparation for UV Lamp Drying
As a nail expert with extensive experience in acrylic nail applications, I can attest that proper preparation is key to achieving the perfect cure under a UV lamp. Here’s a guide to ensure your acrylic nails are impeccably prepped:
- Ensuring Acrylic Nails are Ready for UV Lamp:
- Inspection: After applying the acrylic, inspect each nail. Look for any uneven areas or bubbles. Imperfections at this stage can affect the final outcome.
- Final Shaping: If needed, do a final shape and buff. This step not only refines the nails but also ensures an even surface for the UV light to penetrate effectively.
- Application of the Top Coat:
- Choosing the Right Top Coat: Select a top coat compatible with your acrylic and UV lamp. Some top coats are specifically formulated for LED lamps, while others work best under traditional UV light.
- Even Application: Apply the top coat evenly across the nail, making sure to cover the edges. This not only ensures a uniform cure but also extends the longevity of your acrylic nails.
Pro tip: Always apply thin, even layers of top coat. Thick layers may not cure properly and can lead to a tacky finish.
Now, let’s create a table summarizing the key points in this preparation phase:
| Preparation Step | Key Considerations |
|---|---|
| Inspection of Acrylic Nails | Check for evenness and imperfections |
| Final Shaping & Buffing | Ensure even surface for UV exposure |
| Top Coat Selection | Choose according to lamp type |
| Top Coat Application | Apply evenly, covering nail edges |
Remember, the precision in these preparation steps significantly influences the effectiveness of the UV curing process. For further insights on achieving the ideal thickness in your acrylic nails, I recommend visiting Acrylic Nails Thickness.
Drying Time Under UV Lamp
In my experience as a nail professional, understanding the drying time for acrylic nails under a UV lamp is crucial for achieving optimal results. Here’s a breakdown of what to expect:
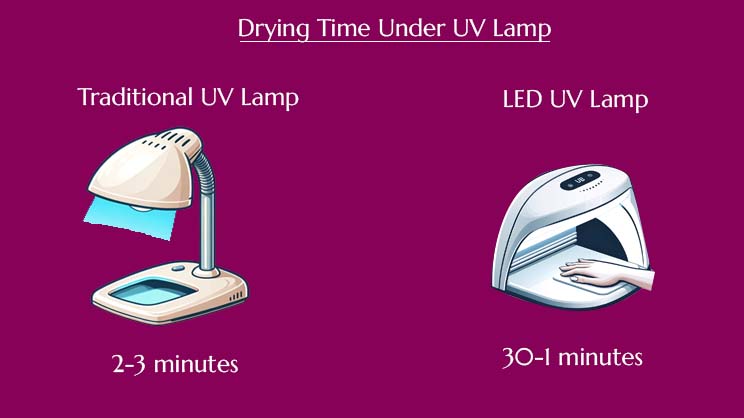
- Specific Duration Required for Drying Acrylic Nails:
- Generally, it takes about 2 to 3 minutes under a traditional UV lamp to cure acrylic nails properly.
- For LED UV lamps, the time is significantly reduced, often around 30 seconds to 1 minute.
- Variation in Time Based on Lamp Type and Power:
- Lamp Type: LED lamps cure faster than traditional UV lamps due to their higher intensity and specific wavelength range.
- Lamp Power: Higher-wattage lamps can cure nails quickly. For instance, a 36-watt UV lamp will cure faster than a 9-watt lamp.
It’s important to note that these durations are approximate and can vary based on the specific products used and the lamp’s efficiency. Consistently using the same type of lamp can help you better gauge the exact curing time needed for your acrylic nails.
As a table, this information is presented concisely:
| Lamp Type | Approximate Drying Time |
|---|---|
| Traditional UV Lamp | 2-3 minutes |
| LED UV Lamp | 30-60 seconds |
Keep in mind that overexposure or underexposure to UV light can affect the quality of your acrylic nails. For more detailed insights on the drying process, Manicure with Acrylic Nails provides a comprehensive guide.
Factors Influencing Drying Time
As someone deeply involved in the world of nail care, I’ve observed that various factors can influence the drying time of acrylic nails under a UV lamp. Understanding these elements is key to ensuring a flawless curing process.
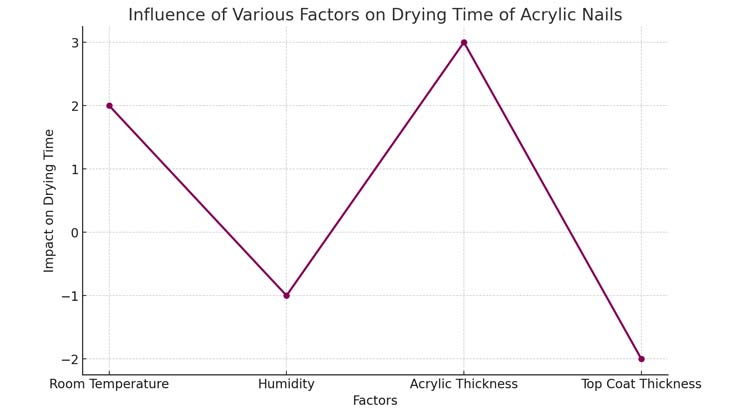
- Room Temperature and Humidity:
- Temperature: Higher temperatures can accelerate the curing process, while lower temperatures may prolong it.
- Humidity: High humidity can affect the curing time and the overall finish of the acrylic nails. It’s best to work in a controlled environment to ensure consistency.
- The thickness of the Acrylic and Top Coat Application:
- Acrylic Thickness: Thicker layers of acrylic require more time under the UV lamp to cure completely.
- Top Coat Thickness: Similarly, the thickness of the top coat can influence drying time. Thin, even layers are preferable for efficient curing.
Let’s illustrate these factors in a table for clarity:
| Factor | Influence on Drying Time |
|---|---|
| Room Temperature | Higher temperatures may speed up curing |
| Humidity | High humidity can slow down the process |
| Acrylic Thickness | Thicker acrylic requires longer curing |
| Top Coat Thickness | Even, thin layers cure more efficiently |
Balancing these factors is essential for the perfect finish. It’s not just about the duration under the UV lamp; the ambient conditions and application techniques play a significant role too. For those facing challenges with the thickness of their acrylic nails, Acrylic Nails Thickness offers valuable tips and solutions.
Best Practices for Using UV Lamps
Let’s talk about a game-changer in nail curing – the right hand placement. Imagine this: Your hands are the canvas, and the UV lamp is your sun. Keep your hands 1-2 inches from the lamp, ensuring each nail gets its moment under the sun. Spread your fingers like a starfish – this isn’t just about uniform exposure, it’s about perfection in every cure.
Understanding Curing Time as an Art
| Aspect | Description |
|---|---|
| Standard Duration | 2 minutes is the typical time for curing under a UV lamp. |
| Personalized Time | Like a chef with their oven, get to know your lamp’s unique qualities. |
| Visual Cues | Observe your nails closely; they’ll show signs if more time is needed. |
| The Acrylic’s Whisper | Listen to the acrylic – it tells its own story of readiness. |
Safety Measures and Precautions
Ever thought about giving your eyes a suit of armor and your skin a shield? Here’s how: UV-blocking eyewear isn’t just cool;
it’s your guardian against invisible rays. And that sunscreen on your hands?
It’s not lotion; it’s liquid gold, protecting your skin from a story of damage.
Avoiding Overexposure to UV Light
Picture this: UV light is like the sun – essential but dangerous in excess. Limit your exposure like you would a summer tan. And if your skin could talk, it would ask for a dermatologist’s wisdom. Heed that call.
Troubleshooting Common Drying Issues
When your nails are under-cured, signaling a need for more time, here’s what you do:
- Incremental Increases: Add 30-second intervals to the curing time, like gentle nudges, until you hit that sweet spot of perfect curing.
- Signs to Watch For: Tackiness or a dull finish are telltale signs that your nails need a bit more UV love.
For over-cured nails, which become brittle as autumn leaves, the approach changes:
- Time Reduction: Reduce the curing time gently. It’s like turning down the volume, letting the nails find their natural strength.
- Visual Check: Over-cured nails may appear too hard or lose their shine. Keep an eye out for these signs.
Adjustments for Different Types of Acrylic Products
Understanding the unique needs of different acrylics is crucial:
- Diverse Curing Times: Some acrylics bask under the UV lamp longer, while others need just a brief encounter.
- Product Specifications: Always refer to the manufacturer’s guidelines. They provide the blueprint for the ideal curing time.
Acrylic Products and Their Curing Needs
| Acrylic Type | Curing Time | Notes |
|---|---|---|
| Standard Acrylic | 2 minutes | Ideal for most common products |
| Thick Acrylic | 2-3 minutes | Requires longer due to density |
| Quick-Set Acrylic | 1-1.5 minutes | Designed for faster curing |
| Temperature Sensitive Acrylic | Adjust as needed | Factor in room temperature |
Maintaining Acrylic Nails Post-UV Curing
After the UV light has worked its magic, the real journey of care and maintenance begins. Think of it as a moonlight waltz, where every step counts for the longevity and health of your acrylic nails.
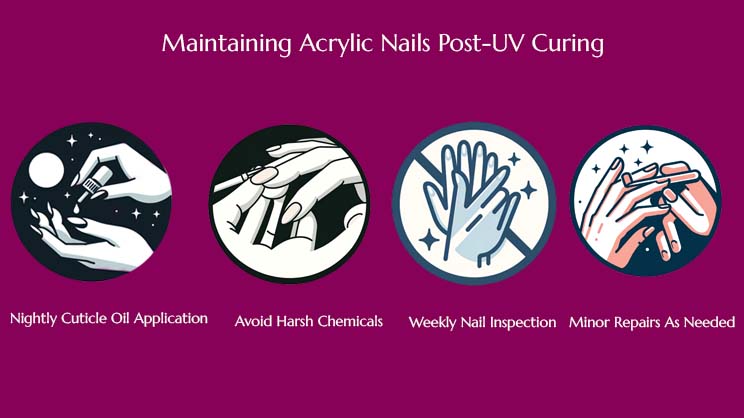
Aftercare Tips for Longevity and Health of Acrylic Nails
Your aftercare routine is like a nightly serenade. Embrace the use of cuticle oil regularly; it’s not just a product, it’s your best ally in keeping your nails and surrounding skin hydrated and healthy. This nightly ritual is crucial in preventing dryness and promoting nail strength.
When it comes to harsh chemicals, avoid them as you would a misstep in your dance. Products like cleaning agents can be harsh on your acrylic nails, leading to premature wear or damage. Always wear gloves when handling such substances to protect the beauty and integrity of your nails.
Suggested Maintenance Routines
Your weekly nail check-ups are akin to diary entries, reflecting the story of your nails. During these inspections, look for any signs of wear such as lifting or chipping. Addressing these issues promptly is not just maintenance; it’s an act of care and love for your nails. Keeping them in pristine condition ensures their beauty and longevity.
Post-Curing Nail Maintenance Guide
| Maintenance Activity | Description | Frequency |
|---|---|---|
| Cuticle Oil Application | Apply cuticle oil to hydrate and protect nails and cuticles. | Nightly |
| Chemical Exposure Avoidance | Use gloves when dealing with harsh chemicals to protect nails. | As needed |
| Nail Inspection | Check for lifting, chips, or wear. | Weekly |
| Minor Repairs | Perform small fixes like filing or reapplying top coat at the first sign of wear. | As needed |
Conclusion
I hope you found this exploration into the time it takes for a UV lamp to dry acrylic nails insightful.
Now, I’m curious to hear your perspective:
Which aspect of the acrylic nail process do you think is most time-consuming?
Is it the nail preparation, the application of the acrylic itself, or maybe the intricate art and finishing touches?
Or perhaps you have a different approach to time management during nail application?
Whatever your thoughts or experiences, I’d love to hear about them.
Please feel free to share in the comments below. Your input helps enrich our understanding of the art of acrylic nails!
